In this article, we will be focusing on various exercises that can help you improve your skills in architectural modeling using Rhino, the widely used 3D modeling software. From creating basic 2D shapes on one plane, to more intricate modeling, these exercises will guide you through the process of creating various architectural models in Rhino.
This means no matter what your skill set is, you’ll be able to refine your skills. These exercises are designed to help you become proficient in creating accurate and detailed 3D models for architectural projects. We will also briefly cover why these exercises are important as well as other sources where you can practice architectural modeling.

contents
Is Rhino good for architectural modeling?
Depending on the country, Rhino may be the most popular software choice for architects as it is usually Revit or Rhino that is used in most educational facilities and in most architectural practices. Therefore, practicing modeling is vital to make sure your skills are up to scratch.
However, it can be hard to perfect using the tools, especially when you need to do something specific and you aren’t sure where to start. This is why it’s best to learn the software from the ground up and begin with exercises that focus on more basic areas of modeling so when you eventually combine your skills you can create the object you envisioned and avoid errors.
Why modeling exercises in Rhino are important
You may think it is easier to begin making a model straight away and solve problems as you go in order to learn. While this could work and may be the best way to go in some cases, actively seeking out specific exercises to complete as you learn Rhino can be the best way to begin learning.
This is important as exercises start off simple and when you begin modeling a more complex shape you will be able to see the new, larger model as a series of smaller tasks that you have done before. This process driven way of working is how complex architectural models are able to be made.
The best at architectural modeling break things down into steps and when done this way, as things get more complicated like if you started using additional Rhino plugins or extensions, you would have a good understanding of what is going on.
Rhino architectural modeling exercises and solutions
Whether you’re a beginner, you want to practice specific skills or you just want a general set of exercises to improve your skill set, the following exercises lay out what you can do to make improvements. If you really want to gain a good understanding of the software, try all of them and refer back to these pages as you go to check if you’re making any mistakes.
Rhino architectural modeling exercises for beginners
When first starting off, a few exercises you can begin with include making shapes and surfaces and using basic commands to automate the process. This may include making a cuboid and making sure you have the right settings turned on in order to make the process as easy as possible.
This is a great place for beginners to start modeling as it combines various tools without making things too complicated
Modeling a cuboid in Rhino for beginners
When learning the software, one of the first things you can do is create basic shapes but make sue you do it efficiently and with a range of tools available. This ensures when you create a larger more intricate shape, you will already be familiar with what you need to do.
Step 1: Use the box command
To start off, you can begin modeling a box by using the box command. This introduces you to commands and also how to create the most basic shape in your toolbox.

Step 2: Decide on the method used to draw the box
Rhino gives the user the option to draw the box as an exact cube by pressing the “diagonal” option after you have done step one or pressing the “3point” option, “vertical” option or the “center” option.
For the sake of making things slightly harder in this beginner exercise, select “3point” which will allow you to input the exact dimensions you would like to form the cuboid. This is important later on as you will be able to create models that are to scale and follow dimensions that relate to each other
This can form the initial workings of a more intricate facade in the future or perhaps other furniture in the building you’re designing.
Step 3: Input the dimensions of the cube
First, click on where you’d like the box to start, and then input the length of the box you would like in the command line. If you have set up the document to a scale of 1:1 and you have set the units to meters. Inputting a length of “4” would mean the length of the cube is 4 meters long. You can read our article on scaling your rhino model if you’d like to learn more about this but once all is done, click on the canvas again and this will complete the length of the box.
Repeat this process for the length and height of the box in order to complete the shape and this will leave you with a box that is set up with the dimensions you have chosen like below.

Once you have done this, you should be familiar with the basic box tools as well as how to use the mouse and command line to start creating shapes if you are a total beginner.
Exercises to practice architectural rendering in Rhino
Having a good idea of how to render is crucial, especially when it comes to modeling the interior of spaces. Being able to model the stairs, roofs or furniture of buildings can help them appear more realistic for a render that you can display on a portfolio page or perhaps just to show off initially to clients or to tutors.
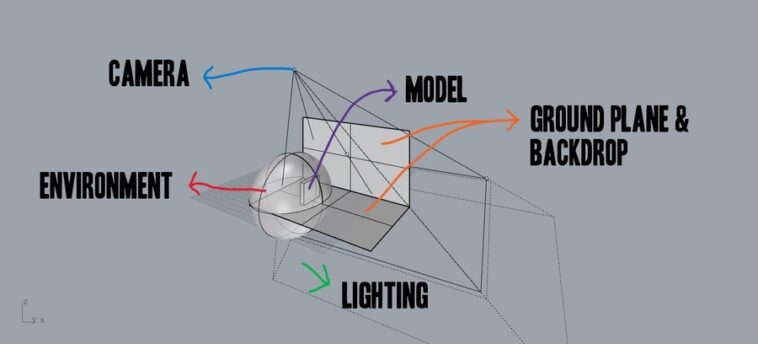
To practice, it is important to understand the basic components of rendering in Rhino as you can then use this as a basis to begin doing exercises to improve your skills. Practice changing each of the below components that make up a good render in order to produce a high quality finish when you eventually render the model in a raytraced view.
The environment that surrounds the model
This refers to any kind of surface that surrounds the entire model that is being rendered including the ground plane and backdrop. To practice different effects, you can try the exercise of surrounding the Rhino model with a sphere and toggling different materials onto the surface.
When you vary this material, you will be able to have a different background when you render the image in raytraced view to the ground plane which can appear blurry as if the background is further away if you want.
The ground plane and backdrop
The ground plane and backdrop are different from the environment because they will not appear blurry when you do the final render. Instead, they will represent the close aspects of the render such as where the model is sitting, and perhaps can serve as a bit of context to the model too such as close by trees or people.
To add this in, add a surface connected to the model at the base for the ground plane and another surface connected to the ground plane further back for the backdrop. Assign textures to both of these surfaces and they will appear closer to the environment when you do the final render in a raytraced view.
The camera position
By pressing the F6 button within the Rhino dashboard, you are able to toggle the position of the camera in perspective view. This allows you to position the camera precisely where you want it in relation to where the light is and where best the model is able to be represented.
Once decided, save the view by naming the view so you can refer back to this chosen viewport at any time.
The lights or light that is projected onto the model
Lighting can be turned on by going to settings in the Rhino toolbar located on the right hand side. Turn on the tick box to turn on the light and adjust it accordingly. Here, you can position the light in different areas and also toggle the hue and luminance of the light too.

Once you have mastered these factors, you should be able to produce stunning renders to capture your Rhino model in the right way to show off in your portfolio and save you the time installing additional plugins to represent your model such as lumion which can be hard to learn.
Go through the below steps as an exercise to familiarize yourself with the process by creating each component as a layer in your Rhino file and playing around with the settings.
Architectural modeling exercises for surfaces in Rhino
Modeling surfaces may seem simple but there are a range of exercises you can try in order to improve your skill set. From dividing a surface to creating a surface from points using scripts, you can get extremely creative with how you can model.
Making sure you are accurate here is vital for later down the line when the model is complete and you need to create a technical drawing. Not only do surfaces need to look good on the model but they need to be free from gaps and also have the right thicknesses when representing physical objects.
A good exercise to practice when doing architectural modeling as a result is creating a wall.
Create a wall in Rhino
First of all, It is useful to practice making things to scale as this is where you can accurately add in the heights of context like scale figures.
Next, draw out the outline of the wall by using the surface tools straight away or you could use the line tool in one plane and then extrude the line to meet the required height of the wall too.
To change the thickness of walls, there are a range of methods but perhaps the most straightforward solution is to offset another surface against the surface you have already created and have each side act as both sides of the wall with the space in between being the inside of the wall.
Best way to find architectural modeling exercises for Rhino
Of course, looking at a series of exercises you can do in Rhino is the best place to start. However, you require further training in order to learn specific things and perhaps wouldn’t mind a more in depth tutorial.
In this case, first of all, subscribe to the Architecture Genie email list to grab some free help straight away that will teach you all you need to know. After this, keep an eye on your emails as we email out a lot of tips throughout the year!
As well as this, for further practice, look no further than other online platforms such as Youtube, Skillshare or even LinkedIn Learning. Also, asking peers and colleagues for advice on where they learned their skills can be a great way to find resources suited for the position you’re currently at in your learning.

Youtube to find modeling exercises
With a lot of things you may want to learn online, doing a search on youtube is never going to give you a shortage of results. However, if you have a very specific problem, this may not be able to be answered, in which case commenting on videos and reaching out to the posting of a video may enable you to get some specific feedback.
Another downside of Youtube is there is no quality control on what is posted online as opposed to the courses on Skillshare or LinkedIn Learning or perhaps another paid platform with informational content.
This means you could be learning from someone who doesn’t have the best idea of what they’re talking about. All in all, when it comes to Youtube, approach any video with some level of skepticism and don’t be afraid to comment for help.
So you don’t spend a lot of time time scrolling trying to find the perfect exercise to practice your skills on Youtube, you can install things like ad blockers to easily skim between videos and skip to the end of the video to see if the final result is what you want before you watch the whole thing.
Skillshare
Skillshare is great because the courses on there are a lot more professional than those published to YouTube. You can also preview the courses to see what’s inside before going ahead and signing up which is great as you can see if there are any architectural modeling exercises in the course before you sign up.
The membership is a monthly fee but once you have access to the platform, you will gain access to all of the courses on the platform and even those unrelated to Rhino, perhaps covering other software you may need to learn as an architect such as Photoshop or Illustrator.
LinkedIn Learning
Most know LinkedIn as a place to network online and apply for jobs but there is in fact a platform that hosts courses within the social media too. Here, LinkedIn approved professionals make courses for those interested.
Unfortunately, the membership isn’t free but students are able to sign up for free if they can prove they’re in a form of formal education.